OpenStack development is fun until DevStack breaks – Unknown
Background
During my Outreachy internship, I experienced a lot of frustration with my Devstack installation getting corrupted. Setting it up again and again was a pain. I remember the very first time, I had it all set up correctly, it took 4 hours to have everything up and running. Subsequent times were a pain. This did prompt me to look for a solution which is presented in this entry.
Technical intro
DevStack refers to a series of bash scripts that pull most recent code from OpenStack individual projects and quickly builds them up to form a working OpenStack environment. This makes it a favorable tool for setting up OpenStack development environments quickly. DevStack makes a lot of changes to a typical Linux installation and is therefore always installed on dedicated machines namely virtual machines or servers.
Due to the complex nature of OpenStack, working DevStack instances can break unexpectedly. To get back up and running in the shortest time possible on your local machine and with one command, please follow this guide. Remember, access to a running Linux instance is assumed.
Prerequisite software
Before we get started, have the following software installed on your Linux instance.
This is an IT automation tool whose instructions are written in YAML.
To install it on your distro, check this link here. For a simpler and better introduction to Ansible, read this or checkout this video on youtube .
This is software that allows you to virtualize different operating systems on your Linux instance. Very handy indeed.
To install it on your instance, do check out your Linux distro package manager here or you can check out the download page here .
Please note, for this post, we use virtual box but you can also check out qemu which can be used in its place and is even more light on system resources.
This is an automation tool used that consumes the virtualization API of the virtualization system (think qemu or virtualbox) that you have installed on your machine and makes it easier to perform commands/tasks using it (Vagrant). It is written in Ruby and can be installed as per the instructions on this webpage. To get started with it, check out the documentation provided on this website.
Getting into the trenches
At this point, you should have all the prerequisite software installed. If not, just update your distro and do look up the error messages you encounter. Come back to this post once all 3 software have been set up.
There are 3 files needed for this task and they are the Vagrantfile, the ansible script and a jinja template that will be used to describe the backend. They should all be in the same folder for the setup to work.
Vagrantfile
This is the file that describes the Virtual machine to be used. It holds specs such as the number of processors, RAM, networking type and OS used. For this post, the Vagrantfile we’ll use is shown below.
Vagrant.configure("2") do |config|
    config.vm.define "devstack-vm" # name of VM
    config.vm.box = "ubuntu/focal64" # OS used for VM
    #config.vm.network "private_network", ip: "10.123.123.123", nic_type: "virtio"
    config.vm.network "private_network", type: "dhcp", nic_type: "virtio"

    config.vm.provider "virtualbox" do |v|
        v.name = "devstack-vm"
        v.memory = 6144 # RAM ucreated
        v.cpus = 3 # Number of CPUs
        v.customize ["modifyvm", :id, "--nested-hw-virt", "on"]
        v.customize ["modifyvm", :id, "--nicpromisc2", "allow-all"]
    end

    config.vm.provision "ansible" do |ansible|
        ansible.verbose = "v"
        ansible.playbook = "devstack-setup.yml" # Name of ansible script that automates setup of devstack
    end
end
The above file shows that for the VM named devstack-vm, Ubuntu Focal will be used as the OS and will need a RAM of 6144MBs and 3 CPUs. Please note, for this setup, a private network is used 🙂
Ansible Script
This is the script that describes the step of actions to be done within the VM after it has been created. Its outline is below.
 name: Vagrant devstack setup
  hosts: devstack-vm
  remote_user: vagrant
  gather_facts: true
  environment:
    GIT_SSL_NO_VERIFY: true
  tasks:
  - name: Clone Devstack from Opendev
    command: /usr/bin/git clone https://opendev.org/openstack/devstack
  - name: Create local.conf
    template:
      src: "local.conf.j2"
      dest: "/home/vagrant/devstack/local.conf"
  - name: Run stack.sh bash script
    command: /home/vagrant/devstack/stack.sh
    register: command_output
  - debug:
      var: command_output.stdout_lines
The steps done are really simple as you can see above. Once, the VM has been created, Devstack is cloned from Opendev . The backend is copied from the local.conf file and then stack.sh is executed while its output is waited upon to see if there is any error.
Jinja template (local.conf.j2)
This local.conf.j2 file is the jinja template that holds the backend used for Manila. In the case below, the ZFSonLinux backend is used. To learn more about Manila backends and what they can do, check this link here.
######################################################################
# This local.conf sets up Devstack with manila enabling the ZFSOnLinux
# driver which operates in driver_handles_share_services=False
# mode
#######################################################################

[[local|localrc]]
ADMIN_PASSWORD=secret
DATABASE_PASSWORD=$ADMIN_PASSWORD
RABBIT_PASSWORD=$ADMIN_PASSWORD
SERVICE_PASSWORD=$ADMIN_PASSWORD
DEST=/opt/stack
DATA_DIR=/opt/stack/data
LOGFILE=/opt/stack/devstacklog.txt
HOST_IP={{ansible_all_ipv4_addresses[1]}}

# Enabling manila services
LIBS_FROM_GIT=python-manilaclient
enable_plugin manila https://opendev.org/openstack/manila
enable_plugin manila-ui https://opendev.org/openstack/manila-ui
enable_plugin manila-tempest-plugin https://opendev.org/openstack/manila-tempest-plugin


# ZfsOnLinux Back end config options
MANILA_SERVICE_IMAGE_ENABLED=False
SHARE_DRIVER=manila.share.drivers.zfsonlinux.driver.ZFSonLinuxShareDriver
MANILA_ENABLED_BACKENDS=bangalore,mumbai
MANILA_BACKEND1_CONFIG_GROUP_NAME=bangalore
MANILA_BACKEND2_CONFIG_GROUP_NAME=mumbai
MANILA_SHARE_BACKEND1_NAME=BANGALORE
MANILA_SHARE_BACKEND2_NAME=MUMBAI
MANILA_OPTGROUP_bangalore_driver_handles_share_servers=False
MANILA_OPTGROUP_mumbai_driver_handles_share_servers=False
MANILA_REPLICA_STATE_UPDATE_INTERVAL=60
MANILA_DEFAULT_SHARE_TYPE_EXTRA_SPECS='snapshot_support=True create_share_from_snapshot_support=True replication_type=readable'
MANILA_CONFIGURE_DEFAULT_TYPES=True

# Required for mounting shares
MANILA_ALLOW_NAS_SERVER_PORTS_ON_HOST=True
Note, the HOST_IP in the content above, regardless of the the backend used, since Devstack requires to know the IP address of the host(think VM) it is being run on, it has to be present within the configuration backend.
Once you have all that set up, it is time to start run devstack. Within the path where you are, type in
vagrant up
then wait for the VM to be automatically created and provisioned. If successful, you will see the output below
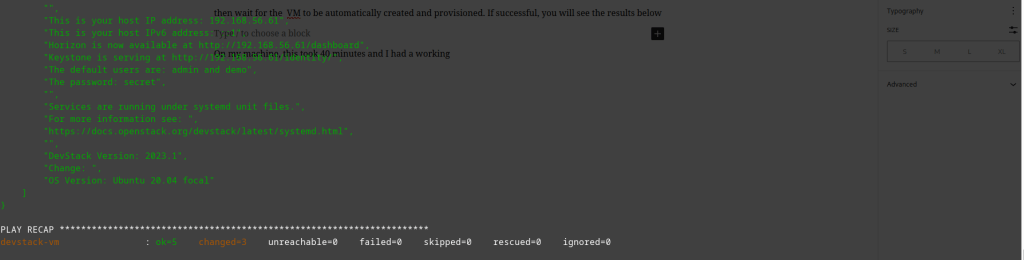
However, if your output does not match the image above, you can investigate the cause of the error within the red output string that will be generated.
At this point, you have a VM running OpenStack Manila. You can ssh into it and contribute to the project in any way you can.
Please note that this guide can be applied for other OpenStack projects too. If you can make something out of it. Do share with the world.

Leave a comment